7 Step guides to creating blog account.

Welcome back my audience. Let me break it down in details on the 7 steps involved in creating your own blog account.

But before then, any word you find confusing as we move on don't forget to make your comments on the down side space available for comment in this platform for possible explanation.
STEP 1 – Choose your blog topic
The very first thing you need to do is choose a topic for your blog.
Most successful blogs focus on one thing. May it be food, travel, fitness, fashion or simply about your business.
We recommend choosing a topic that you feel passionate about or interested in. It’s even better when you are an expert at something, this helps you to grow your blog through writing good, quality content to help others.
Tips for choosing a blog topic:
- are you an expert in something?
- are you passionate about something?
- are you learning something new and want to write about your process?
Here’s an example: If you are highly interested in fitness and you like to train, it’s wise to share your wisdom in a blog that is related to fitness or cover topics on training and nutrition. Through the blog, you’ll be able to get new clients.
You don’t need to choose your blog topic right away, but it’s good if you already have something in mind.
STEP 2 – Find the right blogging platform
First, decide – free blog or self-hosted blog?
Anyone can sign up with a free blogging site or platofrm such as Blogger.com, WordPress.com and Tumblr.com
However, if you are serious about blogging, the free blogging platform is not a way to go.
There are many cons and downsides of a free blogging service (limited monetization, customization and traffic), but most importantly – you’ll have no control over your blog.
And if you want to upgrade, you’ll need to pay more than you should.
The solution for this is to host your blog yourself (have a self-hosted blog).
In that way you’ll have no limitations related to your blog content (such as images and videos). Your blog will look more professional, better looking and can be improved later on. Plus, you actually own your blog.
Of course, if you don’t plan to blog for more than a few weeks, a free blog might make sense. In every other case, we recommend the self-hosted route.
Which blogging platform should I choose?
There many different blogging platforms that you can choose from. Some are more flexible and easier to use, while some are more limited and come with a higher learning curve.
Most recent statistics show that WordPress which is a free (open-source) blog platform is the most commonly used blogging platform in 2020.
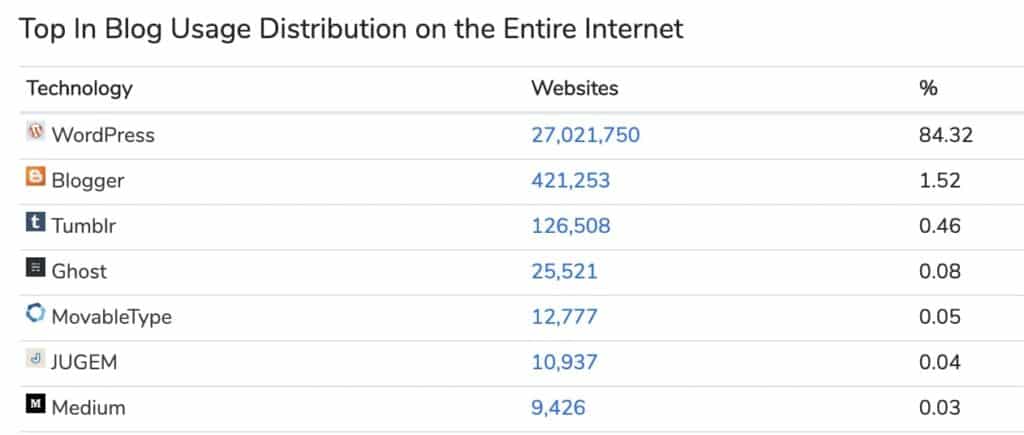
WordPress is followed by Blogger, Tumblr, Ghost, and Medium.
We’ve tried dozens of different blogging platforms, but none of them match WordPress.
Here’s why self-hosted WordPress is likely your best option:
- It’s free to use (open-source)
- It’s very flexible with hundreds of free (and premium) blog themes
- It has a large developer community
- WordPress is being updated and improved regularly
- You will have full control over your blog
How much will it cost to self-host my WordPress blog?
Luckily, not much! All you need is:
- Domain name – your own web address, such as www.YourBlogName.com which is around $10/year, but we’ll show you how to get one for free later in this guide.
- Web hosting – service to host your blog. Simple and reliable web hosting is usually around $4/mo.
In total, it’s around ~$60/year, but it’s an important investment to your blog success.
If you think that blogging is not for you, you can always cancel the hosting service and many providers offer 30 days money-back guarantee. Domain names can’t be refunded, but they will simply expire and become available once you stop paying for it.
We recommend going with the self-hosted route because it’s much more flexible and you can start growing and creating your blog from day one.
STEP 3 – Set up your blog through web hosting (and register domain name)
Full disclosure: WebsiteSetup is affiliated with Bluehost and earns a commission if you decide to make a purchase through our links. Thanks for your support.
To get started with a self-hosted WordPress blog, you’ll be going to need a domain name and web hosting.
We’ve been recommending Bluehost as a blog/web hosting and domain registrar for years.
From Bluehost, you will get (account gets activated instantly):
- Custom domain name (free for the 1st year), with SSL certificate (security).
- Website hosting ($2.75/mo+)
- Simple, one-click install for WordPress
- Free email accounts, like
your.name@yourdomain.com
Of course, you don’t need to use Bluehost, especially when you already have a web host.
Whichever hosting company you choose, make sure it has “one click installs” for blogging platforms such as WordPress. This will make your set up process much easier.
If you get stuck registering a domain name and signing up for Bluehost, below is a quick step-by-step guide that I made.
Registering a domain name and choosing a web hosting plan on Bluehost (EXPANDS)Install WordPress
Once you have signed up with Bluehost, you’re able to install your WordPress blog.
Don’t worry, most web hosting companies offer one click install for WordPress blogging platform, so it should be very easy.
Here’s what you do exactly to get to install WordPress on Bluehost
- Log in to your user profile at Bluehost.
- In the “Home” page click on the blue button “WordPress”
- WordPress installation starts
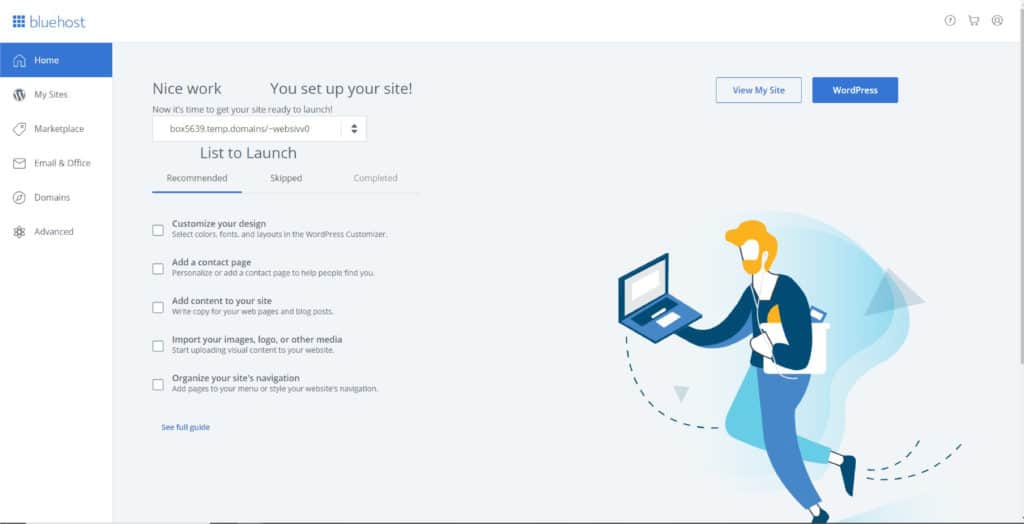
We should note that your domain name activation might take 10 to 15 minutes, so don’t freak out about the weird looking temporary domain name.
Bluehost will allow you to choose your admin login and password for WordPress when it’s done installing.
Experiencing any difficulties with this installation process? Read our other guide on installing WordPress on Bluehost.
I, m sure you understand every bit of the detailed explanation. Click Here or Step by step guide to creating blog account Let's proceed to step 4
Comments
Post a Comment